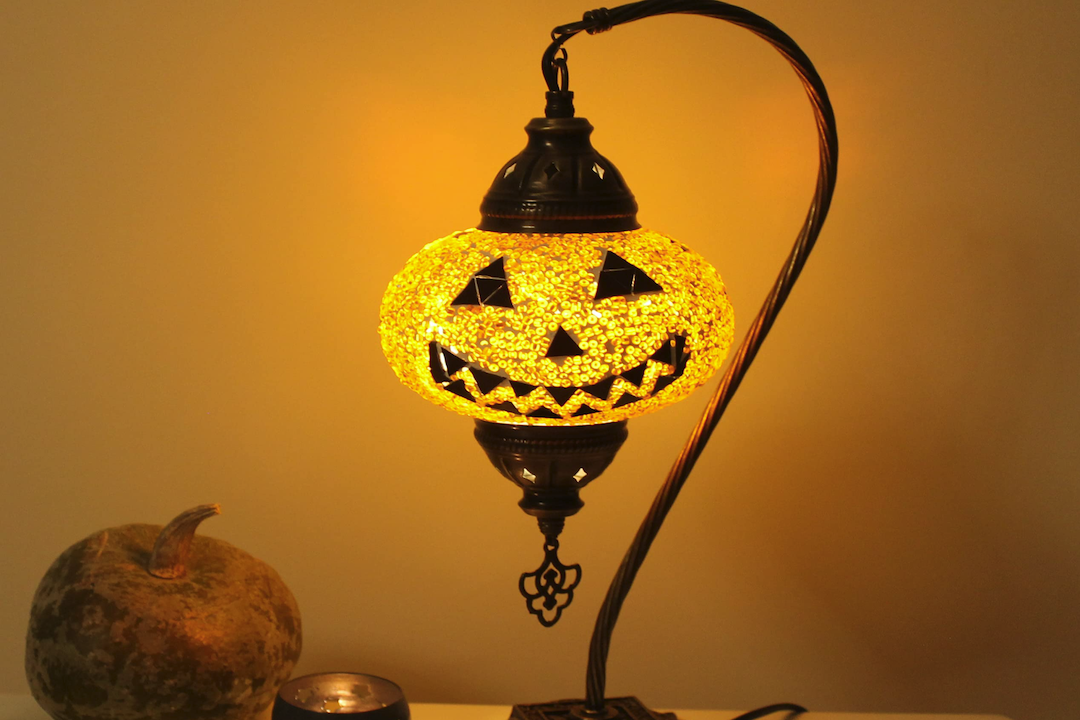
The act of illuminating a space, particularly during transitional seasons, often involves a blend of utility and aesthetics. For many, the pumpkin lamp, a decorative object traditionally associated with autumn and seasonal festivities, serves as both a source of ambient light and a thematic embellishment. While its primary function remains constant – to emit light – its visual presentation can be significantly altered and enhanced through the modification of its external components. This article focuses on the specific upgrade of a pumpkin lamp through the replacement of its glass shade, exploring the practical considerations, potential benefits, and various approaches to this customization.
The pumpkin lamp, in its most common form, typically features a base designed to resemble a pumpkin, often with carved details, and a light source housed within or atop it. A crucial element of its design is the shade, which diffuses and directs the light, simultaneously contributing to the overall visual character of the lamp. The original shade, often mass-produced, possesses a particular aesthetic that may not align with an individual’s evolving decorative preferences or the specific ambiance they wish to create.
The Original Shade’s Role
The factory-issued shade on a pumpkin lamp Miilighting often fulfills basic requirements: diffusing the light and complementing the pumpkin base. However, these shades frequently represent a compromise, designed for broad appeal rather than bespoke aesthetics. They may be constructed from common materials like frosted glass, amber-toned plastic, or even simple fabric, each offering a distinct but often standardized light diffusion and color temperature.
- Light Diffusion: The original shade’s material and texture dictate how intensely and widely the light is dispersed. A highly opaque shade will concentrate light, while a frosted or textured surface will scatter it more broadly.
- Color Temperature: The color of the shade itself, even if translucent, can influence the perceived warmth or coolness of the emitted light. Amber shades, for instance, contribute to a warmer glow, while clear shades allow the bulb’s inherent color temperature to dominate.
- Material Limitations: Common materials may lack desired optical properties or durability. Plastic shades can yellow or become brittle over time, and thin glass shades may be prone to breakage.
Beyond Standard Illumination
The choice of an alternative shade transcends mere light diffusion. It becomes an act of intentional design, allowing the lamp to evolve from a generic seasonal item into a personalized accent. This upgrade can dramatically alter the lamp’s character, transforming it from a quaint novelty into a sophisticated autumnal piece or even an object that transcends seasonal boundaries.
- Thematic Cohesion: A new shade can be selected to harmonize with an existing interior design scheme, whether it be rustic, contemporary, or eclectic. For example, a shade with delicate leaf patterns might reinforce a nature-inspired theme.
- Artistic Expression: The selection of a unique glass shade, perhaps one with intricate patterns, leaded designs, or specific color variations, allows the lamp to become a focal point, a subtle piece of art in its own right.
- Functional Enhancement: In some cases, a new shade can improve the lamp’s functional output. A shade designed for downward focus, for instance, might be more suitable for reading beside, while a wider, more open shade could provide broader ambient light.
Considerations for Shade Selection
The process of choosing a replacement glass shade for your pumpkin lamp requires careful consideration of several factors. These considerations move beyond mere aesthetics, encompassing compatibility, material properties, and the intended visual impact.
Compatibility and Fit
The most critical initial assessment involves ensuring the new shade will physically fit the existing lamp base. This is not simply a matter of visual estimation; precise measurements are paramount.
- Opening Diameter: Most lamp shades are designed to sit on a fitting that has a specific diameter. This internal diameter of the new shade’s opening must match the external diameter of the lamp’s shade holder or harp. Common sizes include 1 5/8 inches, 2 1/4 inches, and 3 1/4 inches. Verifying this measurement before purchase mitigates the risk of an incompatible shade. It is prudent to measure both the existing shade’s opening and the lamp’s fitting to ensure accuracy.
- Securing Mechanism: Different shades employ various securing mechanisms. Some shades are held in place by a “finial” that screws onto a rod extending from the lamp’s harp. Others, particularly globes, might have a lip that rests within a spider-type holder and is secured with set screws. Understanding how your existing shade is attached will guide your selection of a suitable replacement.
- Proportion and Scale: While not strictly a compatibility issue, the proportion of the new shade to the pumpkin base significantly impacts the lamp’s overall appearance. A shade that is too large can dwarf the base, making it appear top-heavy, while one that is too small might look diminutive or out of place. Consider the visual weight and balance; the shade should appear proportionate to the pumpkin base, acting as a natural extension rather than an incongruous addition.
Material and Optical Properties
Glass, as a material, offers a spectrum of optical qualities that directly influence how light interacts with the shade and the surrounding space.
- Clear Glass: Provides maximum light transmission, allowing the full brightness and color temperature of the bulb to pass through. It can introduce refractable patterns if the glass is textured or faceted. This option is suitable when the bulb itself is part of the aesthetic or when a high degree of light output is desired.
- Frosted Glass: Diffuses light evenly, softening harsh glare and creating a more subtle glow. The level of frosting can vary, from a light etch to a dense opaqueness. This is ideal for ambient lighting where direct illumination is not the primary goal.
- Colored Glass: Stains the emitted light with its own hue. Amber, orange, or deep red glass shades can enhance the autumnal theme, creating a warm, inviting atmosphere. Blue or green glass might shift the lamp’s aesthetic away from purely seasonal, offering year-round versatility. The intensity of the color will dictate the degree to which it affects the light’s perceived temperature.
- Textured or Patterned Glass: Adds visual interest even when unlit. Etched designs, ribbed surfaces, or bubbles within the glass can create unique light patterns and shadows when illuminated. These variations can transform a simple light source into a dynamic display of light and shadow.
- Stained Glass (Leaded Glass): Represents a higher level of craftsmanship. Composed of multiple pieces of colored glass joined by lead or copper foil, stained glass shades create intricate patterns and often cast colorful light into the room. This option provides a significant artistic upgrade and can elevate the pumpkin lamp into a decorative centerpiece.
Aesthetic Impact
The choice of glass shade is a declarative statement about the desired ambiance and character of the pumpkin lamp.
- Seasonal Enhancement: For those wishing to reinforce the autumnal theme, shades in warm tones like amber, rust, or deep orange are excellent choices. Shades with leaf motifs, vine patterns, or even subtle textures that evoke natural elements can further embed the lamp within seasonal décor.
- Trans-Seasonal Appeal: To extend the lamp’s utility beyond autumn, consider shades with more universal appeal. Clear or frosted glass shades, or those with minimalist designs, can integrate seamlessly into various interior styles year-round. This approach allows the pumpkin base to become a subtle, non-seasonal accent rather than a temporary fixture.
- Style Alignment: The shade should ideally align with the broader aesthetic of the room. A lamp in a rustic setting might benefit from a shade with an organic texture or a distressed finish. In a contemporary space, a sleek, geometric glass shade might be more appropriate. The shade acts as a bridge between the lamp’s unique form and the surrounding decor.
The Process of Replacement
Replacing a glass shade on a pumpkin lamp is generally a straightforward process, accessible to individuals with minimal DIY experience. While the steps may vary slightly depending on the lamp’s specific construction, the core principles remain consistent.
Step 1: Disconnecting Power and Safety Precautions
Prior to any manipulation of electrical components, the fundamental safety precaution is to disconnect the lamp from its power source.
- Unplug the Lamp: This seemingly obvious step is critical. Failure to do so risks electrical shock. Ensure the plug is fully removed from the wall socket.
- Allow Cooling (if applicable): If the lamp has been in recent use, the bulb may be hot. Allow sufficient time for the bulb to cool down before handling to prevent burns.
- Work Surface: Choose a stable, flat work surface that is well-lit and clutter-free. Laying a soft cloth or towel on the surface can protect both the lamp and the new shade from accidental damage.
Step 2: Removing the Old Shade
The method for removing the existing shade depends on its attachment mechanism.
- Finial-Secured Shades: If the shade is held in place by a decorative finial on top of a harp (a U-shaped wire frame), simply unscrew the finial counter-clockwise. Once the finial is removed, the shade can be lifted off the harp.
- Set Screw-Secured Shades: For shades that sit within a holder and are tightened by small set screws, locate the screws (usually 2-3 around the rim of the holder). Using an appropriate screwdriver, loosen these screws sufficiently to allow the shade to be gently removed. Be careful not to loosen the screws entirely, as they can be easily lost.
- Friction-Fit Shades: Some smaller shades might simply rest on a lip or be held by friction. In such cases, a gentle upward or outward pull should release them.
Step 3: Cleaning and Inspection
With the old shade removed, take the opportunity to clean and inspect the lamp’s components.
- Dust and Debris Removal: Use a soft, dry cloth or a gentle brush to remove any dust, cobwebs, or debris from the lamp’s base, harp, and bulb socket. This ensures a clean installation for the new shade.
- Component Inspection: Examine the wiring for any fraying or damage. Check the bulb socket for any signs of corrosion or wear. If any damage is observed, consult a qualified electrician before proceeding. The harp should be straight and securely attached to the lamp base.
Step 4: Installing the New Shade
Installation is largely the reverse of removal, with particular attention to gentle handling.
- Alignment: Carefully guide the new shade into position. If it is a finial-secured shade, ensure the opening aligns with the harp’s top rod. For set screw shades, gently place the shade into its holder.
- Securing: For finial-secured shades, thread the finial back onto the rod and tighten it clockwise until snug, but do not overtighten, as this could crack the glass. For set screw shades, gently tighten the screws until the shade feels secure and does not wobble. Again, avoid excessive force.
- Bulb Check: Before plugging the lamp back in, ensure the light bulb is securely screwed into its socket. Consider upgrading to an LED bulb if you haven’t already, as they generate less heat and are more energy- efficient, which can be beneficial for enclosed shades.
Step 5: Testing and Adjustment
- Plug In and Test: Once the shade is securely installed, plug the lamp back into the wall socket and turn it on.
- Light Output Assessment: Observe the light output. Does the new shade diffuse the light as desired? Is the color temperature satisfactory?
- Final Adjustments: If the shade appears crooked or off-center, gently turn off the lamp, unplug it, and make minor adjustments to its position or the tightness of the securing mechanisms.
Exploring Shade Styles and Designs
The array of available glass shade styles is vast, offering numerous opportunities for customization. Each style imparts a distinct character, transforming the utilitarian light source into a decorative element.
Classic and Traditional Styles
These styles often draw inspiration from historical designs, emphasizing craftsmanship and ornate details.
- Bell Shades: Characterized by their flaring, downward-sloping shape, resembling an inverted bell. These are a timeless choice and can be found in clear, frosted, or delicately etched glass. They offer a concentrated downward light but often allow some ambient upward light.
- Globe Shades: Spherical or near-spherical, these shades provide omnidirectional light diffusion. They can be perfectly round or slightly elongated, and range from clear to heavily frosted. A globe shade can give a pumpkin lamp a retro or even a minimalist appeal, depending on its finish.
- Empire Shades: Named for their tapered, symmetrical form, wider at the bottom than the top. While more commonly associated with fabric, glass empire shades exist and offer a formal, balanced aesthetic.
- Schoolhouse Shades: Inspired by early 20th-century lighting fixtures, these shades are typically white or cream-colored glass with a distinctive rounded bottom and a slightly flared top. They offer excellent, even light diffusion and a nostalgic, enduring appeal. They can lend a quaint, classic look to a pumpkin lamp.
Contemporary and Modern Styles
These designs prioritize clean lines, innovative forms, and often abstract aesthetics.
- Geometric Shades: Feature angular designs, sharp edges, or multi-faceted surfaces. They can be cube-shaped, dodecahedral, or composed of interlocking panels. These shades can introduce a striking, architectural element to the pumpkin lamp, making it suitable for modern interiors. The angles can create interesting light patterns.
- Minimalist Shades: Focus on simplicity and unadorned form. Often a simple cylinder, cone, or an unfussy globe in clear or subtly frosted glass. They allow the pumpkin base to remain the focal point, providing light without visual distraction.
- Art Glass Shades: Hand-blown or individually crafted, these shades are often unique, featuring organic forms, swirls of color, or embedded textures. These can elevate the pumpkin lamp to a piece of functional art, making a strong artistic statement. The variability inherent in hand-made glass means each shade possesses its own character.
Thematic and Specialty Shades
These shades are designed to evoke specific feelings or themes, often leveraging unique materials or construction techniques.
- Tiffany Style (Leaded Glass): As mentioned earlier, these shades are a mosaic of colored glass pieces, joined by lead or copper foil, creating intricate patterns, often depicting natural scenes, geometric motifs, or abstract designs. A Tiffany-style shade can transform a pumpkin lamp into a sophisticated, handcrafted showpiece, casting colorful light and shadows. The warmth of the leaded glass colors can beautifully complement the pumpkin base.
- Punched Tin (or Metal with Glass Inserts): While not purely glass, shades incorporating metal with glass inserts offer a rustic or industrial aesthetic. The metal component dictates the shape, while glass panels allow light to escape, often in patterned ways. This style could complement a pumpkin lamp in a country or farmhouse-style setting.
- Crackled or Textured Glass: These shades have an intentionally distressed or irregular surface. Crackled glass gives the appearance of fine fissures throughout, while textured glass might have ripples, bubbles, or embossed patterns. These textures add depth and interest, creating unique light diffusion effects and a tactile quality.
Maintenance and Longevity
Once your pumpkin lamp has been upgraded with a new glass shade, proper maintenance ensures its continued beauty and functionality. Glass, while durable, benefits from regular care.
Regular Cleaning
Dust and grime can quickly accumulate on glassware, diminishing its clarity and light output.
- Dusting: For light dust, a soft, dry microfiber cloth is usually sufficient. Gently wipe the entire surface of the shade to remove loose particles.
- Washing (when necessary): For more stubborn grime or fingerprints, you can carefully remove the shade from the lamp. Hand wash it in warm water with a small amount of mild dish soap. Use a soft sponge or cloth. Avoid abrasive cleaners or scouring pads, which can scratch the glass. Rinse thoroughly with clean water and dry immediately with a lint-free cloth to prevent water spots. Ensure the shade is completely dry before reinstalling it on the lamp.
Handling and Storage
Glass shades, even robust ones, are susceptible to breakage if mishandled.
- Gentle Handling: Always handle glass shades with care, particularly when installing, removing, or cleaning. Hold them by the base or rim, avoiding pressure on delicate edges or thin points.
- Temperature Fluctuations: Rapid changes in temperature can stress glass and potentially lead to cracks, especially in older or thinner pieces. Avoid placing a hot lamp shade directly into cold water, or vice-versa.
- Safe Storage (Off-Season): If the pumpkin lamp is a seasonal item, proper off-season storage is crucial. Remove the glass shade from the lamp base. Wrap the shade individually in bubble wrap, tissue paper, or a soft cloth, securing it with tape. Store it in a sturdy box, away from areas where it might be knocked or have heavy objects placed on top of it. Ensure the storage location is temperate and dry.
Bulb Selection and Heat Management
The type of light bulb used can significantly impact the longevity of a glass shade, particularly regarding heat.
- LED Bulbs: Modern LED bulbs are highly recommended for pumpkin lamps with glass shades. They generate significantly less heat compared to incandescent bulbs, reducing the risk of heat stress to the glass and surrounding lamp components. Furthermore, LEDs are energy-efficient and have a longer lifespan, requiring less frequent replacement.
- Wattage Limits: If using older incandescent or halogen bulbs, always adhere to the lamp’s maximum wattage recommendations. Exceeding this limit can generate excessive heat, posing a fire risk and potentially accelerating the degradation of the glass shade over time. The heat can also discolor some types of glass or damage painted finishes.
By adopting these practices, your upgraded pumpkin lamp, adorned with its new glass shade, will continue to provide both light and aesthetic pleasure for many seasons to come. The act of replacing the shade is not merely a repair; it is a renewal, allowing a familiar object to assume new life and relevance within your living space.